
Client Credentials custom Auth. Provider
Hi Devs!
Today, I will show you how to securely create Auth. Provider for Client Credentials Flow.
Without further ado, let’s jump into the interesting stuff!

Introduction
Use Case
Client credentials are one of the most popular ways of authenticating between backend systems. I will show integration between Salesforce and the PayU API, but it can be used in any internal communications between backend systems. It is the go-to authentication flow wherever no user interaction is needed. Other use-case scenarios can include integration with file storage systems, connection to an external database, or accessing a computing engine.
About Client Credentials flow
Basing on the RFC document:
The client credentials (or other forms of client authentication) can be used as an authorization grant when the authorization scope is limited to the protected resources under the control of the client, or to protected resources previously arranged with the authorization server. Client credentials are used as an authorization grant typically when the client is acting on its own behalf (the client is also the resource owner) or is requesting access to protected resources based on an authorization previously arranged with the authorization server.
This means that it is usually used by a party that already owns the resource (a callout is made to the internal system) and can be confidently trusted. This flow shouldn’t be used when accessing externally stored resources.
Communication schema:

In this flow, the client is using his credentials (client_id and secret or other means of authentication) to call out the authorization server, which, if the credentials are correct, is providing an access token.
Goal
Our goal is to extend Auth.AuthProviderPluginClass to create new Auth. Provider and use Named Credentials for secure outbound integration.
Class blueprint without implementation looks like this:
public class CustomAuthProvider extends Auth.AuthProviderPluginClass {
    public String getCustomMetadataType() {
        return '';
    }

    public PageReference initiate(Map<String, String> config, String stateToPropagate) {
        return new PageReference();
    }

    private String getCallbackUrl(Map<string, string> config) {
        return '';
    }

    public Auth.AuthProviderTokenResponse handleCallback(Map<String, string> config, Auth.AuthProviderCallbackState state) {
        return new Auth.AuthProviderTokenResponse();
    }

    public override Auth.OAuthRefreshResult refresh(Map<String, String> config, String refreshToken) {
        return new Auth.OAuthRefreshResult();
    }
    public Auth.UserData getUserInfo(Map<string, string> config, Auth.AuthProviderTokenResponse response) {
        return new Auth.UserData(null, null, null, null, null, null, null, null, null, null, null);
    }
}
Implementation
Custom Metadata
We need to create a new custom metadata object. It will be used as a blueprint for our Custom Auth. Provider, it defines fields that have to be populated during Auth. Provider creation.
By going to Setup > Custom Code > Custom Metadata Types, I’m clicking New Custom Metadata Type to create new metadata.
Metadata definition
We will need only two fields: the name of Named Credentials and the name of Provider.
The object definition looks like this:

Custom Auth. Provider – class implementation
To create custom Auth. Provider, we need to prepare the Provider class that is extending Auth.AuthProviderPluginClass. I will go method by method to explain the implementation.
Get Custom Metadata Type
This method points to the name of the metadata prepared in the previous section. Simply return the name of Metadata, and the fields will be available on the Auth. Provider screen.
public String getCustomMetadataType() {
    return 'Auth_Provider_mdt';
}
Initiate
public PageReference initiate(Map<String, String> config, String stateToPropagate) {
    final PageReference pageRef = new PageReference(getCallbackUrl(config));
    pageRef.getParameters().put('state', stateToPropagate);

    return pageRef;
}

private String getCallbackUrl(Map<string, string> config) {
    return URL.getSalesforceBaseUrl().toExternalForm() + '/services/authcallback/' + config.get('Provider__c');
}
The initiate method redirects the user to an authentication page. This page is not needed for server-to-server integration. In other flows, it will be used to get some input from the user, for example, username and password. In the case of Client Credentials we will simply redirect the user to the provided provider name (new Auth. Provider name). Notice config variable that is providing all values that are set up on Auth. Provider screen.
Handle Callback and Refresh
Okay, those are the most important methods. Here we will be making actual callouts to external system and retrieving access token.
public Auth.AuthProviderTokenResponse handleCallback(Map<String, string> config, Auth.AuthProviderCallbackState state) {
    AuthResponse response = retrieveToken(config);

    return new Auth.AuthProviderTokenResponse(
        config.get('Provider__c'),
        response.access_token,
        '', // refresh token should not be provided in Client Credentials flow
        state.queryParameters.get('state')
    );
}
The refresh method simply calls retrieveToken again. As per the RFC document, refresh token should not be included in the response (if they are, then just include them in the request by overloading retrieveToken method).
public override Auth.OAuthRefreshResult refresh(Map<String, String> config, String refreshToken) {
    AuthResponse response = retrieveToken(config);

    return new Auth.OAuthRefreshResult(
        response.access_token,
        response.token_type
    );
}
Retrieving token
The main method that is doing the authentication callout is retrieveToken. In this method, we will use configured Named Credentials to automatically create authorization headers and securely store secrets.
private AuthResponse retrieveToken(Map<String, String> config) {
    HttpRequest request = new HttpRequest();

    request.setEndpoint('callout:' + config.get('Named_Credentials__c'));
    request.setMethod('POST');
    request.setHeader('Content-Type', 'application/x-www-form-urlencoded');
    request.setBody('grant_type=' + EncodingUtil.urlEncode('client_credentials', 'UTF-8'));

    HttpResponse response = new Http().send(request);

    if (response.getStatusCode() != 200) {
        // should use custom error handling
    }

    return (AuthResponse) JSON.deserialize(response.getBody(), AuthResponse.class);
}
Get User Info and Authentication wrapper
The last method that we need to implement is getUserData. As Client Credentials flow is not about associating a given user with a resource but server-to-server communication, we will simply return dummy data..
public Auth.UserData getUserInfo(Map<String, String> config, Auth.AuthProviderTokenResponse response) {
    return new Auth.UserData(null, null, null, null, null, null, null, null, null, null, null);
}
Lastly, we need a wrapper class for the authentication response:
private class AuthResponse {
    public final String access_token { get; private set; }
    public final String token_type { get; private set; }
    public final Integer expires_in { get; private set; }
    public final String grant_type { get; private set; }
}
Connecting the dots
Now let’s check if everything we did worked. Make sure you followed the previous steps: creating metadata and deploying the code (if you feel lost, check the repository).
Auth. Provider:
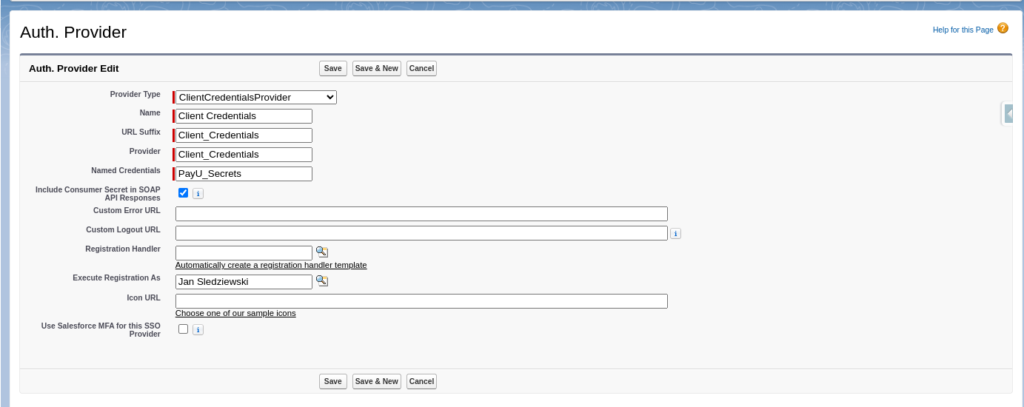
I will be using payment provider PayU’s API to demonstrate the client credential flow. I put Client_Credentials as provider, this will allow us to do a clean redirect during authorization. And PayU_Secrets as this will be Legacy Named Credentials to store authentication details for integration. Provider will be executed as my user (or any other administrator can be selected).
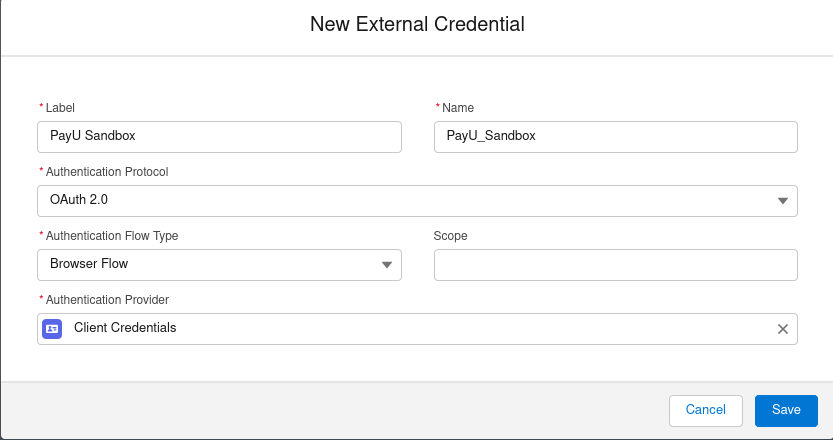
Named Credentials with Secrets:

The values provided here can be found in the PayU API documentation. I’m using Sandbox environment to test out Auth. Provider.
External Credentials and Principal
The configuration is straightforward:
And now, Principal:

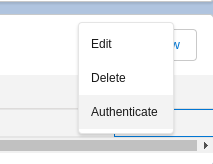
Now test if integration is working by clicking authenticate:
Finalize with Named Credentials
Configure credentials as follows:

And here you are, now you have fully configured integration using the Client Credentials flow!
Summary
Now you should know how to write an authentication provider for the Client Credentials flow, and what is more important, you should be able to understand the implementation details and be able to modify it to your needs!
Thank you for reading, and see you next time.
If you are interested in more posts about integrations, please consider checking out this one about integrating Salesforce with the Google Rest API.
Winter ’24 Release
With Winter’s release, this feature can also be done using the OOTB solution. Check out this article from the release notes.
Sources
The OAuth 2.0 Authorization Framework
Create a Custom Authentication Provider Plug-in
AuthProviderPluginClass Class

