Salesforce To Google REST API Integration
Hello there! 👋
I would like to present a complete guide for Salesforce to Google REST API Integration.
Below you can find the step-by-step configuration.
No more talk. Let’s begin!
Architecture

Custom App
Goal: Enabling custom client applications access to online resources needed by those applications.
create a project, enable API, configure OAuth consent screen and set scopes, create credentials.
- Go to Manage resources,
- Sign in with Google Account.
- Create a new project. –
CREATE PROJECTbutton.
- Go to API Library.
- Make sure that previously created project is selected (picklist next to the Google Cloud logo).
- Click the needed API card.
- IMPORTANT! Click
TRY THIS API. It redirects you to complete documentation about the selected endpoint. Here you can find HTTP Method, HTTP URL and required OAuth 2.0 Scopes. Keep this page for the future use. - When you are fine with all permissions enable API by hitting the
ENABLEbutton on the previous page.
- Go to OAuth consent screen.
- Execute all steps.
- Add all needed scopes for the selected Endpoint. Get scopes from step 2.3. Note! Be careful, add only necessary access! Scope defines what type of access your app can guarantee.
- If you added sensitive scopes, you need to go through the verification. You can do it with the
PREPARE FOR VERIFICATIONbutton. It’s not necessary to accomplish our tutorial, let’s skip it for now. - Go to Credentials.
- Hit
+ CREATE CREDENTIALS. ChooseCreate OAuth client ID. - Set
Application typeasWeb application. - Skip
URIsconfiguration just for now.
- Hit
- You should see
Client IDandClient Secret. Note! Copy and save it for future use.
Auth. Provider
Salesforce
Goal: Allow your Salesforce org to access protected third-party data on behalf of users.
configure Auth. Provider, get callback URL.
Configure a Salesforce Authentication Provider
Setup>Auth. Providers>New
| Property | Description |
|---|---|
| Provider Type | |
| Name | Auth. Provider Name e.g. Google |
| URL Prefix | Used in the client configuration URLs e.g. Google |
| Customer Key | Client ID from step Custom App#6 |
| Customer Secret | Client Secret from step Custom App#6 |
| Authorize Endpoint URL | Leave default https://accounts.google.com/o/oauth2/auth |
| Token Endpoint URL | Leave default https://accounts.google.com/o/oauth2/token |
| User Info Endpoint URL | Leave default https://www.googleapis.com/auth2/v3/userinfo |
| Default Scopes | openid + go to API Library and check the documentation for your Google API. All available scopes you can find here |
- Hit
Save. - Copy the
Callback URLfrom theSalesforce Configurationsection. - Go to Credentials and edit the previously added
OAuth 2.0 Client ID(Step Custom App#5). - Add copied
Callback URLto theAuthorised redirect URLssection.
Named Credentials
Salesforce
Goal: Specifies the URL of a callout endpoint and its required authentication parameters in one definition.
configure Named Credentials with Auth. Provider
Legacy Named Credentials
Creaate a Legacy Named Credentials
Setup>Named Credentials> Arrow next toNew>New Legacy- Complete the configuration form
| Property | Description |
|---|---|
| Label | Named Credentials Label e.g Google |
| Name | Named Credentials Name e.g Google. It will be used in Apex |
| URL | It depends on your API. Go to API Library, and your API and check the documentation. Add base endpoint URL e.g https://www.googleapis.com |
| Identity Type | Named Principal Use the same set of credentials for all users who access the external system from your org. Select this option if you designate one user account on the external system for all your Salesforce org users. More details you can find here |
| Authentication Protocol | OAuth 2.0 |
| Authentication Provider | Provider created in the previous step. |
| Scope | Optional. Specifies the scope of permissions to request for the access token. Your authentication provider determines the allowed values. The value that you enter replaces the Default Scopes value that’s defined in the specified authentication provider. |
- Save
New Named Credentials
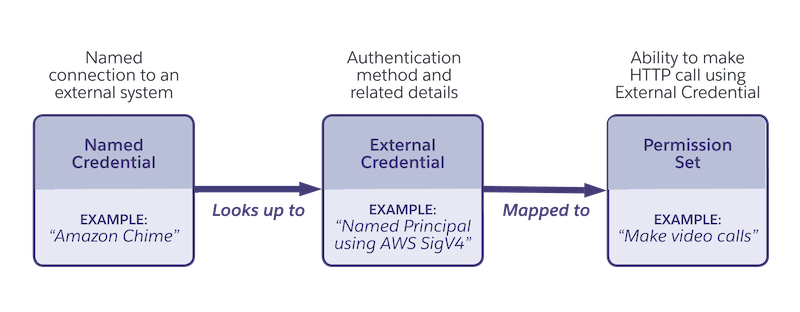
External Credenitials
Create and Edit an External Credential
Setup>Named Credentials- Choose the
External Credentialstab and clickNew.
| Property | Description |
|---|---|
| Label | External Credentials Label e.g Google |
| Name | External Credentials Name e.g Google. |
| Authentication Protocol | OAuth 2.0 |
| Authentication Provider | Provider created in the previous step. |
| Scope | Optional. Specifies the scope of permissions to request for the access token. Your authentication provider determines the allowed values. The value that you enter replaces the Default Scopes value that’s defined in the specified authentication provider. |
- Save
Named Credentials
Create and Edit a Named Credential
Setup>Named Credentials.- Choose the
Named Credentialstab and clickNew.
| Property | Description |
|---|---|
| Label | Named Credentials Label e.g Google |
| Name | Named Credentials Name e.g Google. Will be used in Apex. |
| URL | It depends on your API. Go to API Library, and your API and check the documentation. Add base endpoint URL e.g https://www.googleapis.com |
| External Credentials | Choose the one created in the previous section. |
Permission Set
Setup>Permission Sets>New
| Property | Description |
|---|---|
| Label | Permission Set Label e.g. Google API |
| Name | Permission Set API Name e.g. GoogleAPI |
Setup>Named Credentials>External Credentials- Click
Newnext toPermission Sets Mappings.
| Property | Description |
|---|---|
| Permission Set | Select Permission Set created in the previous step. |
| Identity Type | Named Principal |
- Assign Permission Set to your integration user.
- Go back
External Credentialspage. Click the arrow next to thePermission Set Mappingsand hitAuthenticate.
Apex Code
Salesforce
- Create an APEX class. e.g
GoogleWebService. - Go to API Library. Choose your API and open documentation.
- Choose a concrete endpoint. Check REST API
methodandHTTP requestparams.
Here you can find really simple code to make a callout.
public with sharing class GoogleWebService {
    public static void makeCallout() {
        HttpRequest request = new HttpRequest();
        request.setMethod('REST API METHOD');
        //request.setMethod('GET');
        request.setEndpoint('callout:NAMED_CREDENTIALS_NAME/' + path);
        //request.setEndpoint('callout:NAMED_CREDENTIALS_NAME' + '/users/me/calendarList');

        Http http = new Http();
        HTTPResponse response = http.send(request);

        if (response.getStatusCode() == 200) {
            System.debug(response.getBody());
        }
    }
}
If you have some questions feel free to ask in the comment section below. 🙂
Was it helpful? Check out our other great posts here.